
Miss Mustard Seed FAQs

WHAT IS MILK PAINT?
It’s a powdered, all natural paint (no VOC’s) that has been around for thousands of years. It was found in the pyramids in Egypt and on ancient cave paintings. It’s been used in America for years on furniture, walls, barns, etc. It is a versatile paint that can be used to achieve a variety of looks from chippy and distressed to smooth and sleek.
IS MILK PAINT SAFE?
Yes! Milk Paint is made from 100% natural ingredients. It’s a powdered, no VOC’s product that can be traced back all the way to ancient carvings and art. It is safe for children’s furniture, painting projects indoors and use during pregnancy. It is made of only five natural ingredients – clay, limestone, chalk, casein (milk protein) and iron oxides for pigments.

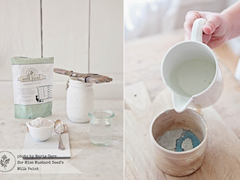
WHAT IS THE BEST WAY TO MIX MILK PAINT?
Always test out a small amount to make sure that you are happy with the mixture. Milk Paint can be a stain or a solid opaque paint depending on how much water you add.
For a solid opaque look: Mix one part water to one part Milk Paint powder. Add water to container/jar first, then add powder and mix with a whisk, electric milk frother or blender. For a super smooth finish, use a blender for best results, otherwise mix with a frother or a whisk for an additional 1-2 minutes for a super fine mix. Mixed Milk Paint should have a table cream consistency for opaque coverage. Once satisfied with consistency, test out a small sample to see if desired consistency is reached. If the brush drags, the mixture is too thick (opaque) and you need to add more water. If sample drips and is too thin (transparent), then add more powder. Adjust as required.
Note: Mixing Milk Paint can be like baking bread and the amount of water required will vary based on the humidity of the day and location. It can also vary depending on the amount of pigment in the color being mixed.
HOW MUCH WILL ONE QUART OF MISS MUSTARD SEED'S MILK PAINT COVER?
This depends on the surface being painted and how much water is added when mixing. The paint coverage will be different on bare wood and porous vs. shiny, previously coated pieces that require the bonding agent. Typically one quart of a very light white will cover approximately 50-70 sq ft, whereas a darker color will cover 70 + sq ft. For example, one quart will cover a large armoire/hutch OR a dresser and two side tables.
MY PAINT LOOKS LUMPY AND UNEVEN - IS THE MILK PAINT BAD?
The majority of the texture and application issues lie in the method the Milk Paint was mixed. A good mix is key to a great finish. Make sure you are stirring your Milk Paint until most of the paint is dissolved. A mini whisk, milk frother, or a blender are great tools for smooth mixes. Let the paint sit for a few minutes after mixing to allow limestone and clay dissolve. If you are painting a large project, stir the paint every few minutes to prevent clay from settling and pigments from separating and dip your brush all the way to the bottom of the container. The paint at the top will be thinner and more translucent, especially if a frother was used to mix paint. Some lumpiness is normal and will usually brush out once paint is applied. MISS MUSTARD SEED PAGE 2
Small lumps can be smoothed out with a fine sand paper after it’s dry, and can lead to some unique finishes.
IS MILK PAINT GOOD FOR RAW WOOD?
Yes, it’s one of the best paints for raw wood. It acts like a stain, but looks like paint. The color will penetrate the wood for a lasting finish that won’t chip or flake. This makes it an ideal paint for raw wood cabinets or floors.
WHEN SHOULD I USE BONDING AGENT?
When the surface is previously finished, painted with a non-porous paint or sealed. Milk paint will resist and chip if it cannot be absorbed, as it is in porous surfaces and raw wood. The ratios of bonding agent can be adjusted depending on the amount of seal or shine on the piece being painted. Do not use the bonding agent or use it in select areas if a “chippy” look is desired. Remember that painting a pre-finished without sanding and/or using the Bonding Agent is unpredictable.
HOW DO I GET THE "CHIPPY" LOOK?
The chippy look is one of the most popular finishes for Milk Paint, but it can sometimes be a bit tricky to accomplish. Here are some things to consider when trying to achieve this look:
- The finish on which you are painting: is it sealed, shiny, or painted? If it is raw wood or porous, the Milk Paint will be absorbed and will not chip or flake. A resist, like the Wax Puck or Hemp Oil needs to be used.
- Milk Paint will “resist” surfaces in which it can’t be absorbed. This resisting will create chips and flakes. It is possible for the milk paint to flake away from the entire piece if the surface is too slick and doesn’t have any “tooth”. To achieve some “grip”, sand where you want adhesion or add the bonding agent on areas where more coverage is desired. It may take some trial and error, but Milk Paint is the only paint that will create an authentic, chippy finish, so it’s worth trying!
I WANTED MY PIECE TO CHIP, BUT IT DIDN'T. HOW CAN I MAKE IT HAPPEN?
If you want the Milk Paint to resist certain areas, we recommend trying an advanced technique by using the Hemp Oil or Wax Pucks. Simply apply the Hemp Oil generously in areas where chipping is desired. Apply the paint immediately over entire surface. The paint will look will separate and pool some on the areas where oil was applied. Don’t over work the paint on those areas. As paint dries, it will start to peel and flake, creating and authentic, chipped finish. Wipe or light sand loose paint and finish with any MMS Wax or Hemp Oil.
To use the Wax Puck as a resist, apply one coat of milk paint and allow it to dry. Rub the Wax Puck over the edges, corners and “high points” of the piece. Anywhere the wax is applied will resist the paint, so make sure it is applied randomly and in places where paint would naturally wear over time. Apply a second coat of milk paint and allow it to dry completely. Distress surface with fine grit sand paper or damp cotton cloth to easily remove the paint where wax was applied. revealing first coat underneath. Finish with Furniture Wax, Hemp Oil, White Wax or Antiquing Wax.
THE PIECE I PAINTED CHIPPED A LOT AND I DON'T WANT IT TO CHIP ANYMORE. HOW CAN I PREVENT IT FROM CONTINUING TO CHIP?
Super chippy pieces will need a coat of polycrylic (water based polyurethane) to prevent future chipping. Do not use hemp oil on these finishes as the oil may cause it to continue chipping.
If the piece chipped some, all of the loose paint has been removed and the rest is adhering well, the Furniture Wax, Antiquing Wax or White Wax will provide a wonderful finish. The piece will not continue to chip unless exposed to intense sunlight or extreme heat.
HOW DO I CREATE A CRACKLE EFFECT?
Paint your piece and apply direct heat immediately after coating (such as a blow dryer or heat gun) to areas you want to crackle. This is a really easy, natural crackle to achieve without having to use a crackle medium product.
WHAT IS THE FURNITURE WAX?
The Furniture Wax is used as a protective topcoat. It’s similar to other waxes on the market, except it’s creamier and very low odor.
Apply it to a piece of raw wood, stained wood or painted furniture with a cloth or brush. Buff after about 5-10 minutes. Apply additional coats for a higher sheen and more durability.
IS WAX A DURABLE FINISH?
YES, it’s a very durable finish. If it’s marred, just lightly sand and add another coat of wax. Refinishing the entire piece is not required. I have it on my kitchen table and it has held up beautifully to two young boys!
CAN I USE THE FURNITURE WAX, ANTIQUING WAX R WHITE WAX OVER OTHER PAINTS? OR CAN I USE ANOTHER BRAND OF WAX OVER MMS MILK PAINT?
Yes, you can use other waxes on Milk Paint and you can use MMS Waxes on acrylic, chalk/clay paints, flat latex, stained wood, etc.
WHAT'S THE DIFFERENCE BETWEEN ANTIQUING WAX AND FURNITURE WAX?
Antiquing wax has dark pigment in it that will age and darken your paint. Furniture wax will dry clear and give your colors the richness that they need after they dry.
WHAT IS THE HEMP OIL?
Hemp Oil is a finish that is a nice alternative to the wax. It is all natural, so it’s great for people who are
sensitive to chemicals. Hemp Oil is best when it’s applied to a porous surface (like raw wood, stained wood or Milk Painted raw wood.) It will absorb into the surface, creating a durable finish. It can be used over Milk Paint over an old finish as well, though. Wipe on with a clean cloth, then wipe away excess. Apply additional coats for more shine and durability. This is also a great product to revive dry, tired wood.
WHEN SHOULD I USE HEMP OIL INSTEAD OF WAX?
As stated above, Hemp Oil is 100% natural,so it’s the ideal finish for customers who love and use Milk Paint because it’s all natural. It’s a food safe finish that can be used on cutting boards, butcher blog counters and kitchen tables. Hemp Oil is also great for projects that will be used outside. Once it cures (after approximately 30 days), it protects and wears beautifully in the elements. Wax will break down and emulsify in the heat. We do not recommend waxing pieces that will be in the heat, sun or rain.
For an extra durable interior top coat, apply a coat of Hemp Oil and let dry, then apply wax on top. Remember wax over oil, never oil over wax!
WHAT'S THE DIFFERENCE BETWEEN MMS ANTIQUING WAX AND OTHER "DARK WAXES" ON THE MARKET?
MMS Antiquing Wax was developed specifically to be used to antique paint finishes. Dark waxes are meant to be used as a wood stain/wax in one. Because of that, the dark wax is very saturated with pigments and can look heavy and streaky on a finish if not mixed with clear wax or mineral spirits. Antiquing Wax only has a small amount of pigment, so it works more like a glaze with the body of a wax. This product is also low odor and can be applied with a brush or clean cloth.
DO I HAVE TO PRIME BEFORE USING MILK PAINT?
No. You can simply apply the bonding agent to the first coat of paint. That will make the first coat act almost like a colored primer. You do not need to add the bonding agent to the second coat. If the “chippy” look is desired, do not use the bonding agent and do not prep the piece.